Study of automation line for assembly of alternators
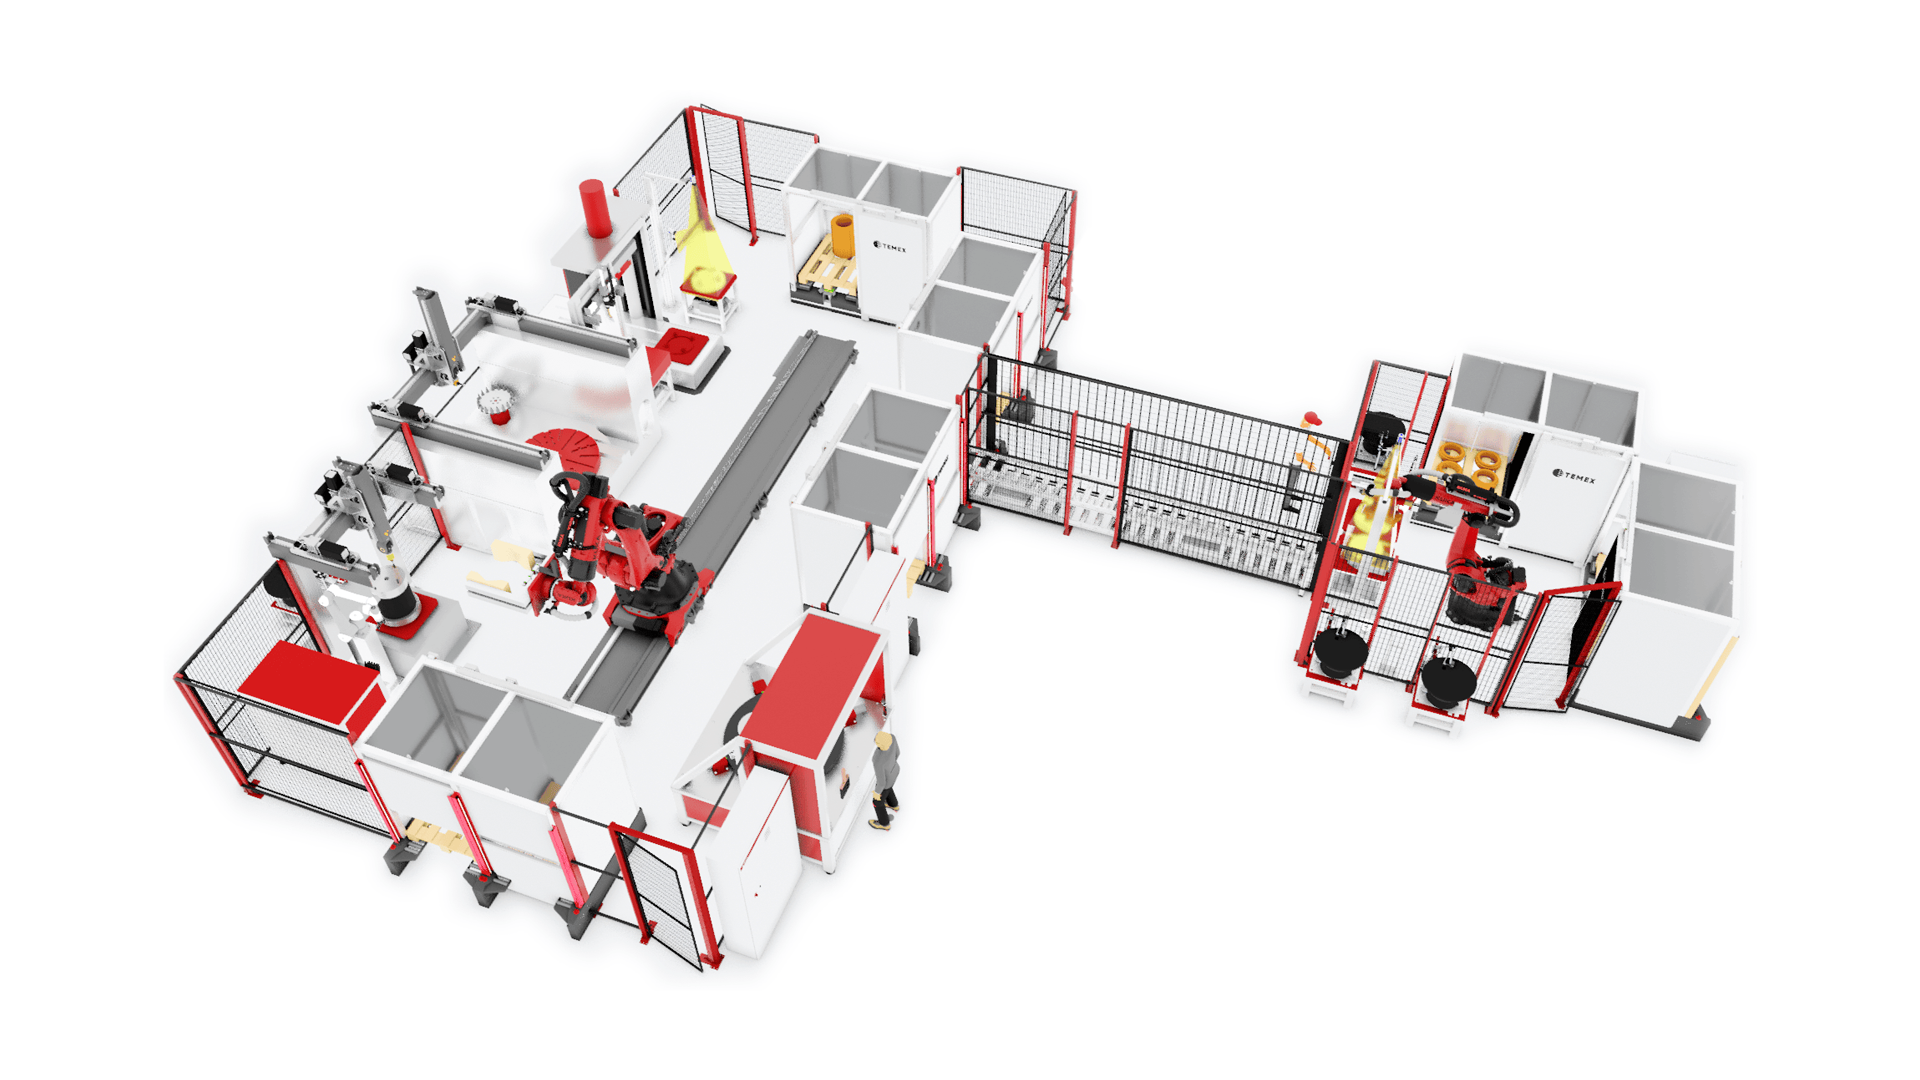
Study of a compact solution for the construction of a rotor with a stator and palletisation of the assembled parts for subsequent assembly with the rotor (not included in the study).
STUDY OF AUTOMATION LINE FOR ASSEMBLY OF ALTERNATORS
REQUEST
For our customer in the mining industry we have prepared a study of a compact automated palletising line for the assembly of alternators for heavy machinery. The aim of the assignment was to create a solution as small as possible in space, which would allow to effectively eliminate the strenuous and monotonous activity of employees and to verify the maximum target performance or cycle-time, with a view to return on investment. The aim of the study is to create a solution as small as possible in space, which would allow to effectively eliminate the strenuous and monotonous activity of employees and to verify the maximum target performance or cycle-time, with a view to return on investment.
OUR SOLUTION
We based the entire line design on three main nodes:
● Robotic stator cover production
● Connection of the stator to the carcass
● Final assembly
Basic line diagram and description
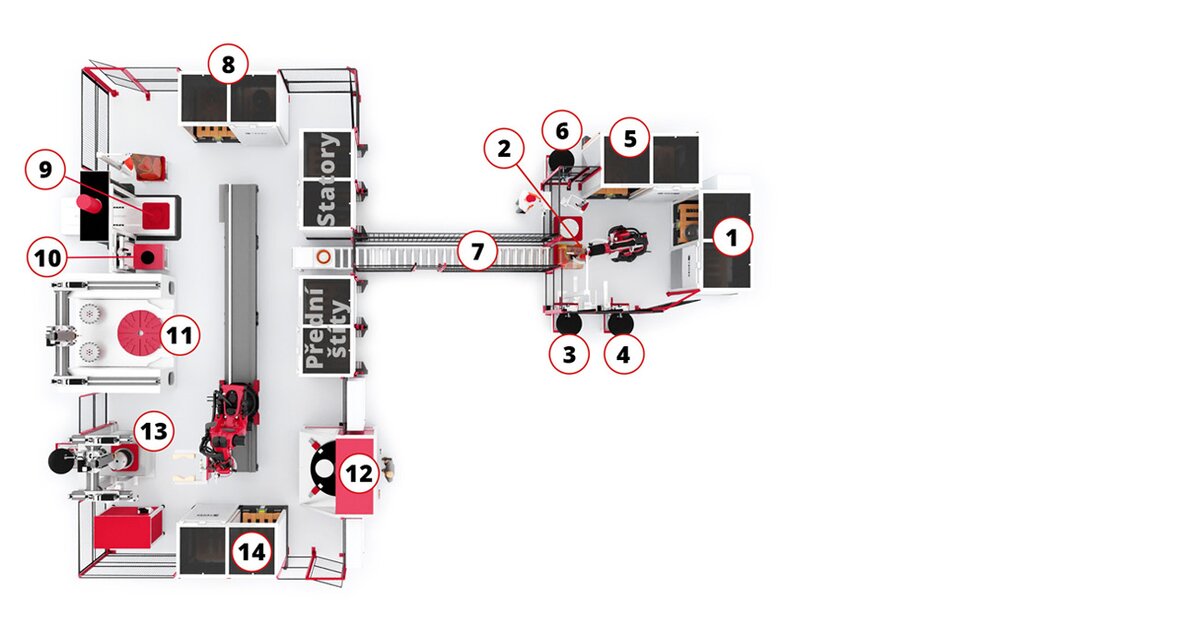
Step 1: Establishing the rear shield
Assembly begins with the rear shield being founded on the positioner. The positioner is designed to ensure proper orientation of the part for subsequent operations. This feature ensures that the rear shield is accurately positioned in the desired position, which is critical to successfully continuing the assembly process.
Step 2: Move to the universal loading table
Once the rear shield is correctly positioned on the positioner, the part is moved to the universal loading table. This table is designed to handle a variety of back shield diameters, increasing the flexibility of the manufacturing process.
Step 3: Establishing the small pad
Next, a universal gripper is used to grasp the small pad and place it exactly in the middle of the back shield. This operation requires a high degree of precision to ensure that the pad is correctly positioned and that subsequent assembly steps go smoothly.
Step 4: Establishing the O-ring
The next step is to establish the O-ring. This sealing element is key to ensuring a tight joint between the components, so its correct placement is critical.
Step 5: Mounting the stator exciter
Next, the stator exciter is placed on the positioning table. This component is first aligned to ensure its precise orientation, and then attached to the back shield.
Step 6: Screwing in the parts
The robot exchanges the gripper for a screwdriver and attaches all the parts (small washer, O-ring and stator exciter) to the rear shield. This step is important to firmly connect all components and ensure their stability during operation.
Step 7: Move the part to the next station
Once assembly is complete in the first robotic cell, the final part is moved onto a conveyor that transports it to the next robotic station. At this station, the robot is placed on a mobile stand, allowing flexible handling of the parts.
Step 8: Handling the stator carcass
At the next station, the robot grabs the stator frame and places it on the positioning table. The carcass is then moved to the press, which lifts it into position for the next assembly step.
Step 9: Stator assembly
The stator is then grasped by the robot and also placed on the positioning table to ensure its correct orientation. Once aligned, the stator is moved to the press where it is joined to the stator frame.
Step 10: Welding the carcass to the stator
The skeleton and stator are then placed on the welding station where the two components are firmly joined by welding. This process ensures that the parts are strong enough for subsequent operations.
Step 11: Weld machining
After welding, the welds must be machined to ensure their quality and proper surface finish. To do this, the assembly is placed in a special machine tool.
Step 12: Inspection and impregnation
At the points where machining operations have been carried out, it is necessary to carry out quality control and impregnation against corrosion. This step is crucial to ensure the longevity and durability of the assembly.
Step 13: Final assembly
The robot then grabs the front shield and places it on the final assembly station. The stator connected to the skeleton is then added to this front shield, and finally the rear shield from the previous robotic cell. All these parts are connected by a bolt, which is then attached with a screwdriver.
Step 14: Removal of the finished part
Once assembly is complete, the finished part is placed at the pick-up location where it is ready for further processing or shipping.
Contact us with your project and we will be happy to design a customized solution for you.
Benefits of our solution:
- Elimination of laborious and monotonous human work
- Speed and accuracy - automated stations can achieve high speed and accuracy, increasing overall productivity
- Flexibility - lines can be designed to handle a variety of product types, allowing for easy customization of the production process
- Robot integration - the deployment of industrial and collaborative robots increases flexibility and efficiency
- Quality and inspection - lines often include automated quality control systems, ensuring consistent and high quality products

